
From github.io to xavierforge.dev: Custom Domain Setup
/ 15 min read
–viewsTable of Contents
While migrating my blog from Hexo to Astro recently, I took the chance to overhaul the entire writing-and-publishing experience.
So why move “house”?
Mainly because the Hexo theme I relied on had gone unmaintained for ages, and the publishing flow was a bit of a hassle — every time I finished an article I had to manually tweak formatting across different platforms and copy-paste things around.
It also happened that I switched entirely to Obsidian for managing notes last year, and I’d been wanting to improve this workflow, so I went all in and dragged Claude Code along to help me move.
The experience now is much smoother: I just drop the article I want to publish into the published folder in my vault, pair it with the right frontmatter, and it publishes automatically — no more tedious manual layout like before.
While doing my homework for this move, I browsed plenty of blogs other people had set up (and peeked at everyone’s stack along the way), and noticed everyone had their own cool domain.
The more I looked, the more I itched to have one too, so I decided to make my own — and that’s how this article was born.
The Lightbulb Moment: GitHub Pages and a Personal Domain Aren’t Either/Or
But just as I made up my mind to buy a domain and was about to pull out my card, I’d actually been holding onto one misconception.
All along, I’d assumed that hosting a personal site on GitHub Pages meant the URL was forever stuck at <GitHub account>.github.io.
If you wanted a cool personal domain, you’d have to go find another host or platform to deploy on — so at first my head was full of: “Ugh, which platform is the easiest to migrate to?”
But after a bit of reading and research, I immediately realized I’d been asking the wrong question entirely.
It turns out the two can absolutely coexist! No choice needed at all — you can still host the site for free on GitHub Pages while swapping the URL from xxx.github.io to your own dedicated domain name.
In plain terms, GitHub Pages keeps being the “house” (free hosting), and the custom domain just hangs a nice “personalized nameplate” on that house.
In other words, this so-called “migration” doesn’t even deserve the name — it’s purely a matter of spending a little money on a nameplate.
But of course it wasn’t as simple as I’d imagined. Walking through it for real, the whole setup-and-verification process turned out to be pretty interesting, and I stepped in a few small pits along the way that are well worth recording.
So what follows is my complete process, from “buying a domain” to “the new domain officially going live.”
First, a note on my environment / stack — if your setup is similar to mine, you can basically copy it verbatim:
- Framework: Astro 6
- Hosting: GitHub Pages (auto-deployed via GitHub Actions)
- DNS management: Cloudflare
Step 1: Choosing a Domain and Checking Availability
How to Choose a TLD (Top-Level Domain)?
The first question you’ll hit when buying a domain is definitely: what name do I pick?
This part was relatively easy for me. For the sake of personal-brand continuity, I hesitated a bit between xavierdataforge and xavierforge, and went with the latter.
For one, it’s not too long; for another, it keeps the “forge” imagery of forging and crafting. But this is entirely down to personal taste — get creative on your own.
Once the main name is decided, the next thing is choosing the suffix (the TLD, Top-Level Domain).
I put together a rough comparison of a few common suffixes and their approximate annual fees for reference:
| Suffix | Annual fee (approx.) | Notes |
|---|---|---|
.dev | ~$12 | Heavy developer vibes! The whole TLD is on the HSTS preload list (forces HTTPS — very clean and secure). |
.com | ~$10 | The most universal, cheapest, classic option the general public knows best. |
.app | ~$14 | Like .dev, forces HTTPS, but leans more toward “application” or software-product connotations. |
.io | ~$50 | A favorite of the tech and startup crowd, but pricey, and the .io territory has faced some international uncertainty lately. |
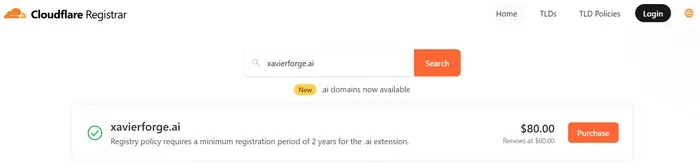
.ai | ~$80 | Super trendy, riding the AI wave, but much more expensive (and usually requires a minimum 2-year registration). |
In the end I picked .dev without hesitation, because it looks as cool as .ai (definitely not because the savings could almost cover another month of MAX), and it forces HTTPS at the browser level, which feels very clean and crisp.
Checking Whether a Domain Is Already Registered
Domains are first-come, first-served, so once you’ve picked a name you love, you have to confirm it’s still “a free agent” — otherwise the cool name you spent ages thinking up instantly goes to waste.
Depending on the suffix you chose, the command to check availability differs slightly.
First, if you went with .com or .io, you can query directly in the terminal with whois (install it first if you don’t have it):
whois xavierforge.com # returns "No match for domain" = availablewhois xavierforge.io # returns "Domain not found." = availableBut if, like me, you chose a TLD operated by Google (Charleston Road Registry) such as .dev or .app, the built-in whois usually can’t reach the bottom-level registry info.
In that case, RDAP (an HTTP-based query protocol) is most accurate.
We can use curl to look at the HTTP status code — a 404 means nobody has registered it, while a 200 means you’re a step too late:
# rdap.org 302-redirects to the corresponding registry, remember -L to follow itcurl -sL -o /dev/null -w "%{http_code}\n" https://rdap.org/domain/xavierforge.dev# see 404 printed? Congrats, it's available!After confirming xavierforge.dev was available, I went straight to Cloudflare Registrar and bought it (okay, fine — you can actually tell whether it’s taken just by searching on the web page).
I strongly recommend buying domains at Cloudflare, because they advertise “renew at cost” — none of those pricing traps where the first year is cheap and the second year fleeces you.
Step 2: Configuring DNS in Cloudflare
After buying the domain, we need to set up DNS so this new nameplate correctly points at the GitHub Pages house.
Go into the Cloudflare dashboard your domain DNS Records, and get ready to add the following records.

Note: when you add records shortly, Proxy must be turned off to DNS only (gray cloud). This cloud defaults to orange (Proxied), and you must remember to click it to gray (DNS only).
That’s because, with the orange cloud on, traffic first goes through Cloudflare’s own SSL certificate, and GitHub’s system can’t automatically issue a dedicated Let’s Encrypt certificate for our domain — it might even cause an infinite redirect loop due to a conflict between the two SSL modes.
With the gray cloud set, traffic hits GitHub Pages cleanly and directly, letting GitHub handle certificate issuance entirely.
- Ladies and gentlemen! Add 4 A records (apex domain, set Name to
@)
The most basic job of an A record (Address Record) is to translate a domain (e.g.xavierforge.dev) into a server’s IPv4 address. Think of it as a contact list mapping names to phone numbers.
Set Name to@(meaning the apex domain) and point the IPs at GitHub’s servers:185.199.108.153185.199.109.153185.199.110.153185.199.111.153
- Add 4 AAAA records (apex domain, set Name to
@)
AAAA records do exactly the same job as A records, except they map to the newer, much more complex IPv6 addresses.
Mainstream servers today (including GitHub Pages) already support IPv6, so I strongly recommend setting these up too, to ensure smooth connectivity across all kinds of network environments.
Again, set Name to@and fill in the IPs:2606:50c0:8000::1532606:50c0:8001::1532606:50c0:8002::1532606:50c0:8003::153
- Add 1 CNAME record (www subdomain)
A CNAME (alias record) can’t point at an IP address; it’s used to point one domain at “another domain name.”
We set it forwww, which effectively tells the browser: “If a visitor knocks onwww.xavierforge.dev’s door, just hand it off to GitHub Pages for me!”
This trick is super handy with managed services: if GitHub ever changes its IP someday, we don’t have to come back and edit anything — GitHub knows how to handle it itself.- Name:
www - Target:
xavierforge.github.io
- Name:
Once it’s set up, you can verify in the terminal with dig whether DNS has propagated:
dig +short xavierforge.dev# should return the four 185.199.x.153 IPs you just set
dig +short www.xavierforge.dev# should return xavierforge.github.io.
Step 3: Repo-Side Setup (Astro + GitHub Pages)
Back in our local project, there are two places to adjust, plus a GitHub Actions script to set up fully automated deployment for us.
- Add a
public/CNAMEfile:
Create a file namedCNAME(all caps, no extension) under thepublicfolder, containing just the apex domain.
Astro copies it intodist/untouched during the build:xavierforge.dev - Update the Astro site URL:
To ensure the canonical links, Sitemap, RSS, and the OG image for social sharing all use the new URL, you must edit the config file.
In my project, you just changesrc/site.config.ts:url: "https://xavierforge.dev/", - Prepare the GitHub Actions deploy script:
Since I said I wanted to improve the publishing experience, fully automated deployment is of course a must.
If, like me, you have an Astro project, create.github/workflows/pages.ymlin the project root — you can copy mine directly:name: Deploy to GitHub Pageson:push:branches:- mainworkflow_dispatch:permissions:contents: readpages: writeid-token: writeconcurrency:group: pagescancel-in-progress: falsejobs:build:runs-on: ubuntu-lateststeps:- name: Checkoutuses: actions/checkout@v6- name: Setup Nodeuses: actions/setup-node@v6with:node-version: "22"cache: "npm"- name: Install dependenciesrun: npm ci- name: Buildrun: npm run build- name: Upload Pages artifactuses: actions/upload-pages-artifact@v5with:path: ./distdeploy:needs: buildruns-on: ubuntu-latestenvironment:name: github-pagesurl: ${{ steps.deployment.outputs.page_url }}steps:- name: Deploy to GitHub Pagesid: deploymentuses: actions/deploy-pages@v5
This script is actually quite simple: mainly it specifies the Node.js environment (I use v22), runs npm ci to install dependencies, and npm run build to bundle the Astro project.
Then it uses GitHub’s official upload-pages-artifact to upload the bundled ./dist folder, and finally hands it to deploy-pages to deploy to GitHub Pages.
Once you commit and push the files from the first two steps together with this YAML script to GitHub, GitHub Actions kicks off and fully automatically re-bundles and deploys for us.
But here’s where a pit to step in showed up!
⚠️ Pitfall 1: With GitHub Actions Deploys, the CNAME File Doesn’t Auto-Set the Custom Domain
Lots of older tutorials online say: “Just push the CNAME file and GitHub Pages will automatically set up the custom domain for us.”
But in fact, that’s the “old behavior” from deploying via pushing to the gh-pages branch.
Here I’ve also upgraded to the modern deploy flow using actions/deploy-pages above, and the CNAME file in the artifact does not automatically get written into GitHub’s Pages settings — we have to register it manually.
You can do this in the GitHub web UI (Repo Settings Pages Custom domain, enter the domain).
Or, like me, show off by using the GitHub CLI to call the API (but don’t rush to hit Enter — read on to ⚠️ Pitfall 2):
gh api --method PUT repos/<owner>/<repo>/pages \ -f cname=xavierforge.dev \ -f build_type=workflow # explicitly tell GitHub we deploy via workflow, to avoid the setting drifting⚠️ Pitfall 2: The API’s Chicken-and-Egg Problem
If you plan, like me, to never lift your hands off the keyboard and configure everything end-to-end with gh commands, watch out here for a state-conflict pit.
Suppose our repo happens to be in the enforce-HTTPS-on state (https_enforced: true). When we hit Enter and dashingly submit that CNAME-setting command above, GitHub throws an error outright: The certificate does not exist yet (HTTP 404)
That’s because GitHub wants to enforce HTTPS, but we’ve only just put on the new domain — it hasn’t issued the new certificate yet.
At this point we have to take a step back and do it in this order: first make sure Enforce HTTPS is off and set the CNAME → wait for GitHub to issue the certificate (state becomes approved) → and only then turn Enforce HTTPS back on.
To be safe, here’s a foolproof one-stop set of commands:
# 1. Bind the new domain, forcing https_enforced=false to dodge the 404 errorgh api --method PUT repos/<owner>/<repo>/pages \  -f cname=xavierforge.dev \  -f build_type=workflow \  -F https_enforced=false
# 2. Check the certificate issuance state# Run this repeatedly until the terminal prints the state as 'approved' (usually takes a few minutes)gh api repos/<owner>/<repo>/pages \  | python3 -c "import sys,json;c=json.load(sys.stdin).get('https_certificate') or {};print(c.get('state'))"
# 3. Once the certificate is approved, run this final line to turn enforce-HTTPS back ongh api --method PUT repos/<owner>/<repo>/pages -F https_enforced=true
Step 4: Verifying It Worked
After running the commands and finishing setup, you can check whether the various redirects work as expected.
We can verify directly in the terminal with curl:
# 1. The apex domain should return 200 OK (the first line shows HTTP/2 200)curl -sI https://xavierforge.dev | head -1
# 2. The www subdomain should 301-redirect to the apex# Here we use grep -Ei to grab the status code (HTTP) and the target (location) togethercurl -sI https://www.xavierforge.dev | grep -Ei "^HTTP/|^location:"
# 3. The old github.io URL should also 301-redirect to the new domain (so old SEO and external links don't break)curl -sI https://xavierforge.github.io/ | grep -Ei "^HTTP/|^location:"
If everything is configured correctly, the apex domain will cleanly get 200, and the two redirect commands after it should print output similar to this:
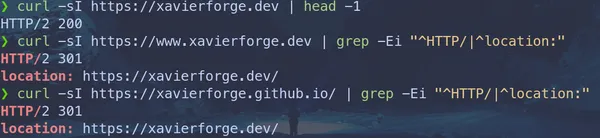
Seeing these two lines both dutifully return 301 and point to the new domain — perfect!
Step 5: Account-Level Domain Verification (Preventing Takeover)
The last step is very important: we need to bind and verify this domain to our own GitHub account.
Because if you skip this step, then someday if a CNAME record happens to be misconfigured, or you fat-finger an edit, another malicious GitHub user could put *.xavierforge.dev into the Custom domain of their own repo — that’s a “subdomain takeover” of my domain, using it to host their own site (so evil!).
There’s no public API for this part; you have to dutifully switch to the browser and go through the web UI:
- Open the Pages page in your account settings: https://github.com/settings/pages (note! this is your “personal account” Settings, not a single repo’s Settings).
- Click
Verified domainsAdd a domain, and enter the domain (e.g.xavierforge.dev).

GitHub personal account Settings → Pages → Verified domains → Add a domain - GitHub gives us a TXT record’s info:
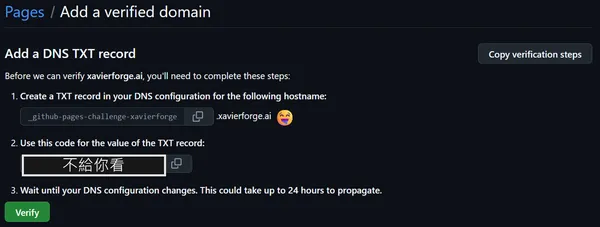
The domain-verification TXT record GitHub provides (Name and Value) - Name:
_github-pages-challenge-<GitHub account> - Value: a randomly generated token string.
- Name:
- Go back to Cloudflare’s DNS settings page and add this TXT record.
The complete setup should now look like this:
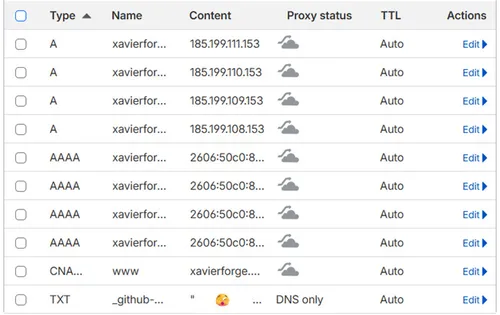
The full DNS records configured in Cloudflare, all in one view - After confirming the record has taken effect with
digin the terminal, go back to GitHub and hitVerify.Terminal window # Check whether the TXT record has propagated on DNSdig +short TXT _github-pages-challenge-<GitHub account>.xavierforge.dev
After verifying on the web, you can also use the API to check the repo’s Pages status and confirm whether protected_domain_state has become verified:
gh api repos/<owner>/<repo>/pages \ | python3 -c "import sys,json;print(json.load(sys.stdin).get('protected_domain_state'))"# if the terminal prints verified, congrats, you're all done!Wrap-Up
After all that fuss, the dedicated new domain is finally live for real!
The HTTPS certificate, the various 301 redirects, and the anti-takeover mechanism are all in place, and paired with the Obsidian auto-publish flow — done and dusted.
Finally, let me condense for my future self (and for everyone reading) the few key landmines I stepped on this time:
- GitHub Pages doesn’t reject custom domains: it hosts for us for free, and the domain is just the nameplate we bought — the two can absolutely coexist perfectly.
- Cloudflare must use the gray cloud (DNS only): don’t use the orange cloud (Proxied), or GitHub can’t issue the certificate and you’ll trigger an SSL redirect loop.
- Actions deploys and CNAME: after upgrading to the
deploy-pagesdeploy, theCNAMEfile in your code won’t auto-set the Custom domain for us — you must call the API yourself or register it in Settings. - Certificate ordering: first set the CNAME (keeping HTTPS off) → wait for the certificate to be approved → only then turn on
https_enforced=true. - Don’t forget the Astro config: remember to update the
siteURL too, so the Sitemap, RSS, or OG Image don’t still point at the old URL. - A
.devdomain comes with built-in security: HSTS preload forces the browser onto HTTPS, so plain-HTTP 404s can be completely ignored. - Remember account-level domain verification: protect your own domain and prevent malicious takeover.
Recording this process means that next time I get the itch to spin up a new site, I’ll have a ready-made SOP to follow!